
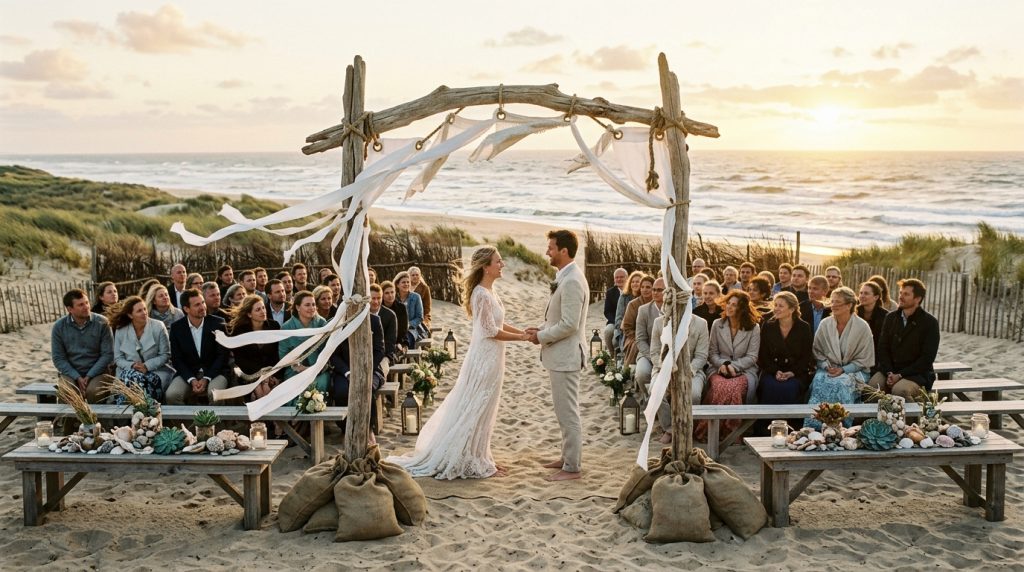
How to decorate a beach wedding venue when wind is a problem? I learned the hard way after my cousin’s ceremony nearly collapsed under a 25-mph gust.
You’ll get a plan that actually holds up: anchored ceremony pieces, low-profile tablescapes, bridal styling that survives a breeze, and a short shopping kit that won’t break the bank (expect core décor costs between $500–$1,500 for intimate setups). I’ll also share the ugly truths nobody posts on Instagram.
The vibe I aim for here is barefoot-luxe coastal — think warm driftwood, linen tones, and unfussy greenery. This approach fits micro-weddings and destination elopements, or couples on a budget who want a polished, practical seaside look.
I’ve noticed people are trading towering floral towers for compact, weight-friendly centerpieces. That’s smart. Wind is fickle. Plan for it and your photos will thank you.
1. Set the Scene: Ceremony Arch and Aisle Styling
Result: a ceremony backdrop that reads romantic on camera and doesn’t topple.
Use a low, wide arch. My favorite is a 7–8 ft driftwood frame with a 4-ft base depth so it resists tipping. Anchor each leg with sandbags (30–50 lb each) and bury stakes into the sand when allowed.
Swap chiffon for heavier fabrics. Sailcloth, canvas strips, or linen weigh down beautifully and photograph soft without turning into a kite. Hem edges and add grommets so you can clip fabrics close to the frame using stainless carabiners or small shackles.
Ugly truth: Tall, delicate arches look great on Pinterest but topple fast. Don’t be that couple.
For aisle markers, use weighted shepherd hooks or low wooden benches instead of individual chairs that catch wind. If you use ribbons, make them short (6–8 inches) and stitch or hot-glue a small coin weight inside the hem.
Vendor notes: driftwood arches are easy to find on Etsy or through local rentals (rental cost $75–$200/day). I bought sandbag sets and grommet kits on Amazon (affiliate: theoceanvows) for under $50.
2. Layer Texture with Coastal Table Décor
Result: table settings that look luxe up close and survive gusts.
Keep centerpieces low and wide. Use 6–8 inch wooden bowls or shallow terracotta trays filled with succulents, sand, and shells. These are heavy and photograph well from every angle.
Use tablecloth clips or non-slip pads under linens so winds don’t turn them into sails. I also like weighted chargers — heavier metal or stone-look chargers stop place settings from shifting.
Avoid tall taper candles and towering arrangements. Candles in hurricane glasses or LED votives are safer and create the same glow. Glue shells or tiny stones to napkin rings to add weight and coastal texture.
Ugly truth: Long, flowing runners are romantic until they become a guest trip hazard. Keep lines low and anchored.
Products I often recommend: silicone table clips, cork-backed placemats, and battery-operated warm LED votives (Amazon searches tagged theoceanvows).
3. Dress for Sand and Wind: Bridal Look Essentials
Result: hair and dress choices that stay put and still look dreamy in photos.
Shorter or fingertip-length veils work best. If you want cathedral drama, use a duvetyne-weight veil hem and sew in veil weights at the corners. I attached small veil weights from Amazon (affiliate: theoceanvows) and it cut the flying-away shots in half.
Hair: tight-ish styles, low buns, or half-up with plenty of pins. Use discreet combs and hairspray with a matte finish. Bring emergency bobby pins, a travel can of spray, and a mini sewing kit for quick hem tucks.
Shoes: swap stilettos for espadrille wedges, block heels, or barefoot sandals. Sand grips keep platforms from sinking.
Ugly truth: Flowing trains drag sand and get full of shells. Consider a bustle or a detachable overskirt for photos.
4. Finish with Florals, Favors, and Final Details
Result: finishing touches that survive gusts and still delight guests.
Florals should be dense and wired. Ask your florist for bubble-style bouquets and low compotes wired to heavy bases. Use florist tape and waterproof glue where stems meet containers.
Signage needs weight. Place easel signs in metal or wooden weighted stands, and supplement with sandbags behind them. For place cards, shell-nameholders or tiny tent cards glued to driftwood slices work beautifully and won’t fly away.
Favors like small succulents in tins or laminated coastal recipe cards are windproof and charming. Avoid balloon releases — they’re a hazard and never stay put.
Vendor note: local florists often have boxed weights and anchored stands — ask for “windproof” styling. Etsy sellers do great shell place-card kits.
5. Windbreaks, Lighting, and Practical Systems
Result: a comfortable guest experience and lighting that lasts.
Install temporary windbreaks behind the ceremony or seating area. I used jute-free bamboo screens clipped together and draped with low linens to keep lines soft. You can also position the ceremony near natural dunes or vegetation whenever possible.
Lighting: string lights anchored to sand-filled buckets or shepherd hooks filled with concrete mix. Use zip ties and heavy-duty clips. For evening, opt for D-cell or rechargeable lanterns rather than light glass pendants that clatter in gusts.
Pack a “wind kit” for setup: sandbags, stainless carabiners, grommet tool, heavy-duty zip ties, double-sided tape, and a small mallet. I keep one in my car for every seaside event.
Ugly truth: Tension poles and freestanding gazebos rarely do well on open beaches unless professionally anchored. Don’t DIY that one.
Quick shopping list (estimates):
- Sandbag set (4): $25–$60 (Amazon affiliate: theoceanvows)
- Grommet kit + carabiners: $15–$30
- Silicone table clips & non-slip pads: $10–$25
- Veil weights & heavy veil hem tape: $8–$20
- LED votives (set): $15–$40
Conclusion
Wind doesn’t have to ruin the look you want. Anchor, lower, and weight first. Choose materials that read dreamy but behave reliably. I still remember the moment the ribbons held their place and my cousin walked past a perfectly anchored driftwood arch — worth every extra sandbag and grommet.
If you want, tell me your ceremony site (open dune, rocky cove, protected bay) and I’ll suggest a 1-page setup checklist and a short tool list tailored to that spot.