
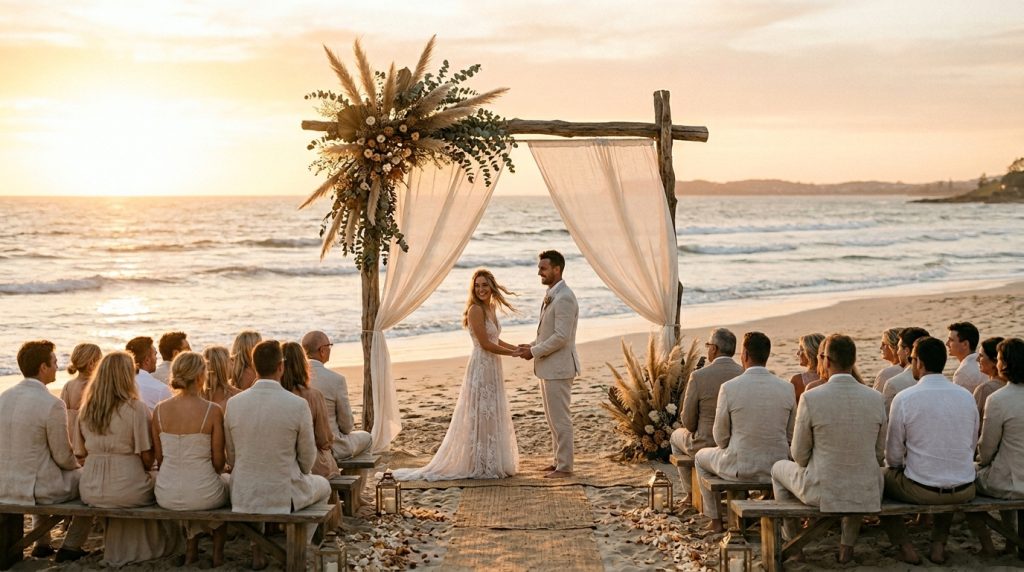
How to decorate a wedding arch without making it look overdone starts with a clear visual goal. I wanted an airy, beachy arch that read effortless in photos — not a Pinterest tower that fell apart under the first gust.
You’ll learn a simple formula (structure + one strong texture + one color + windproofing), budget ranges ($200–$1,200 depending on real wood vs. rental), and the exact products I used or searched for on Amazon and Etsy. If you want my precise picks, look up my Amazon list with tag theoceanvows.
This look suits barefoot-luxury, minimalist shoreline, and small destination ceremonies. It’s ideal for intimate elopements or micro-weddings where you want a statement arch but not a stage. Lately I’ve noticed couples choosing driftwood, dried florals, and muted greens over frothy fabric and oversized bouquets — cleaner and lower-maintenance in salty air.
1. Set the Scene: Ceremony Arch and Aisle Styling
Start with your arch material. I built an 8-ft cedar arch (Home Depot 4x4s, about $120) for a DIY day-of install. Rentals are great if you don’t want tools — many beach vendors offer lightweight bamboo or driftwood arches for $150–$400.
Ugly truth #1: white-on-white fabric disappears on bright sand. Pick a tonal contrast — warm linen, soft sand, or pale driftwood — so the arch reads in photos.
Keep lines simple. One asymmetrical floral cluster looks smarter than three matching bouquets taped on. I used a single spray on the top-left and a small trailing piece on the bottom-right. That keeps the eye moving without clutter.
Aisle styling: low, beach-proof markers — think small driftwood stumps, lanterns weighted with sand, or clusters of shells on wooden stakes. Avoid tall freestanding arrangements; they flop in the wind.
2. Anchor the Look: Windproofing & Practical Hardware
The trick is making it survive wind and salt. I learned this the hard way at a 60-person ceremony where the chiffon became a parachute.
Use proper anchors. Rebar or threaded rods pounded into the sand, with sandbags or heavy water weights, work better than flimsy stakes. For rented arches ask your vendor about a “sand ballast kit.” For DIY, buy 2–4 sandbags ($10–$20 each) and 4 rebar stakes from a hardware store.
Ugly truth #2: pretty fabric + ocean breeze = disaster. Avoid floor-length chiffon for windy sites unless you secure it heavily. Instead, choose shorter panels (6–8 ft) of linen or lightweight gauze and clip them with floral wire and leather cord.
Bring a kit: zip ties, marine-grade fishing line, extra clips, floral wire, and heavy-duty clamps. I keep a clear tote labeled “arch emergency” — it saved a ceremony.
3. Layer Texture with Coastal Table Décor
If you’re styling reception tables near the arch, echo the arch materials subtly. Use raw wood runners, neutral linen napkins, and low greenery garlands.
I like preserved eucalyptus garlands (Afloral, Etsy sellers) because they handle humidity and look real in photos. Pair with one statement floral — dried pampas or bunny tails — for height without weight.
Budget tip: silk stems for arch accents (about $20–$35 per cluster on Amazon) photograph beautifully and survive salt air. If you prefer fresh, keep bouquets small and swapped to a cooler until ceremony time.
4. Dress For Sand And Wind: Bridal Look Essentials
Your dress and veil should match the arch’s movement. I told my bride: pick a veil or train no longer than 6 ft if the site is windy. Lightweight chiffon and crepe photograph like a dream and won’t snag on a salt-sticky rig.
Ugly truth #3: heavy beads and long trains look dramatic in photos but are miserable in heat and sand. Choose breathable fibers (silk crepe, rayon blends, lightweight chiffon). For shoes, wedges or barefoot sandals work best on soft sand.
Groom tip: linen suits in muted tones mirror the arch’s palette and stand up better in humidity than full wool.
5. Finish with Florals, Favors, and Final Details
Keep florals focused. One strong cluster on the arch, low table greenery, and minimal aisle markers are more elegant than matching extras everywhere.
I sourced dried pampas from Etsy for $25 a bunch and mixed them with preserved eucalyptus for the arch spray. For a blue-green pop, add one accent — sea-glass ornaments or a navy silk ribbon.
Lighting matters. For late-afternoon ceremonies add small fairy-light garlands tucked into the arch base or lanterns along the aisle. Battery-operated LED candles are beach-safe and affordable (search Amazon tag theoceanvows for my top picks).
Product shortcuts I used or tested:
- 8-ft Cedar lumber for DIY arch — Home Depot (~$120)
- Rebar stakes & sandbags kit — local hardware (~$40 total)
- Preserved eucalyptus garland — Afloral/Etsy (~$30–$60)
- Dried pampas stems — Etsy (~$20–$35 per bunch)
- Heavy-duty clamps and marine fishing line — Amazon (look with tag theoceanvows)
Common mistakes couples make
- Overstuffing the arch with flowers. Less is more on a bright beach.
- Forgetting anchor weight. If the arch moves, everyone notices.
- Choosing delicate fresh flowers for midday heat. They brown fast in salt air.
Quick visual rules to follow
- One anchor color + one texture + one accent color. Example: driftwood + linen + sage green.
- Asymmetry reads intentional. Place florals on one side.
- Scale matters. For 50 people, an 8-ft arch feels balanced. For 10 guests, go 6 ft.
If you want my exact Amazon shopping list (arch clamps, sandbags, preserved eucalyptus, LED lanterns), search with my affiliate tag theoceanvows — it helps me keep curating real-world, tested picks for readers.
Closing note: The best beach arch looks like it belongs there, not like it’s trying too hard. Choose one strong material, one texture, and one color, anchor it properly, and let the ocean do the rest.