
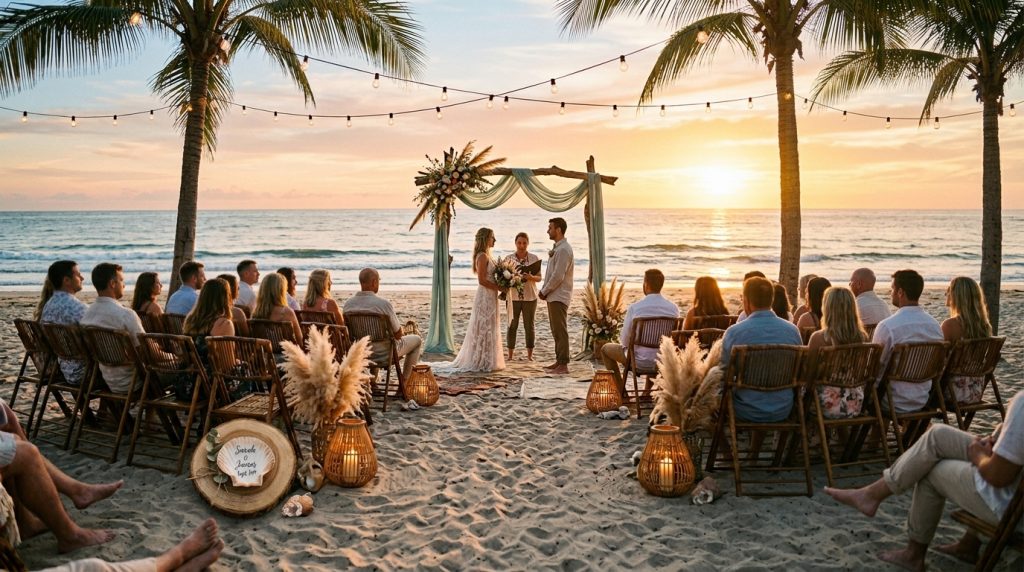
Our 30-person ceremony looked full and intentional — and I did it for about $750 in core décor. If you’re wondering how to decorate a small beach wedding without it feeling empty, this is the exact blueprint I used.
You’ll learn how to anchor the space, layer texture so a small guest list reads rich, and where to spend vs. save (expect roughly $500–$1,500 for ceremony and table décor). These ideas suit micro-weddings, elopements with guests, and couples who want barefoot luxury without looking sparse.
Pick a vibe: boho coastal, minimalist shoreline, or nautical elegance. I aimed for “barefoot luxury” — neutral tones, driftwood accents, and warm lighting. Lately I’ve noticed couples favoring driftwood installations and low lounge clusters over tall, ornate arches. That keeps everything grounded and intimate.
1. Set the Scene: Ceremony Arch and Aisle Styling
Start by anchoring one focal point. Small weddings feel empty because there’s no visual center. A low driftwood arch (5–6 ft tall) draped with a single, wide linen panel in “seafoam” or warm sand creates modern drama without blocking the view.
Ugly truth: tall, ornate arches look great in photos but topple in wind. I swapped a heavy metal arch for lightweight driftwood tied with marine rope. It looked beachy and never shifted.
Line a short aisle with grouped elements — not evenly spaced single markers. Three rattan lanterns clustered with a bundle of dried pampas and a small pile of oyster shells reads intentional and full. I used 10–12 inch lanterns ($20–$35 each) and weighed them with rock-filled canvas bags hidden in the sand. (Find similar on Amazon — search “rattan lantern theoceanvows”)
Quick hacks:
- Use beach-safe anchors (sand stakes) for everything tall.
- Skip a long runner; it disappears in sand and flaps.
- Create height variety: low clusters + one statement arch.
2. Layer Texture with Coastal Table Décor
On a small sweetheart or family table, less is more — but layers make it look lush.
Start with a raw linen runner (18–20 inches wide) over a small wooden farm table. Add a low garland of mixed greenery and neutral blooms (think eucalyptus, white lisianthus, and dried grasses). Intermix 2–3 rattan votives and a single glass hurricane with a pillar candle inside.
Ugly truth: votives that rely on open flames get blown out. Use LED candles or protected hurricanes. I used rechargeable LED pillars that looked warm and never failed.
Spend on texture, not bottles. I rented wooden chargers and splurged on one statement centerpiece piece (dried palm fan + local flowers). The rest I filled with thrifted glass bottles and milkglass from local shops — a $40 investment looked like $400 on photos.
Product tip: search “rechargeable LED pillar candle theoceanvows” on Amazon for battery-run options that survive wind.
3. Dress for Sand and Wind: Bridal Look Essentials
The dress sets tone. For a small beach wedding, pick fabric that moves and breathes: chiffon, crepe, or lightweight silk. Avoid long trains unless you want sand embroidery in every photo.
I wore a bias-cut chiffon dress with a 2-inch detachable train for portraits. For shoes, get leather sandals with a toe strap (keeps them on when stepping on uneven sand) or go barefoot with foot jewelry.
Ugly truth: hair and makeup that ignore humidity fall flat fast. I booked a MUA who specializes in coastal weddings and used a light, sweat-proof setting spray and braided my hair once the breeze picked up. It stayed put.
Groom tip: linen suit in a light khaki — looks refined without overheating.
4. Finish with Florals, Favors, and Final Details
Small weddings let you personalize favors. I found shell place cards at a coastal home décor shop and painted each guest’s name on a small scallop shell. It cost me $1–$3 per guest and felt custom.
Floral strategy: keep bouquets loose and low. Use locally available filler (sea lavender, local grasses) to cut costs and make the palette cohesive with the shoreline.
Ugly truth: too many small decor pieces scattered around read like clutter. Group items into vignettes: a welcome table with a framed sign, one lantern stack, and the guestbook. Nothing else.
For signage and stationery, waterproof cardstock is your friend. I laminated the ceremony timeline and used a weighted driftwood slice to keep it from blowing away.
5. Create Intimacy with Light and Sound
Lighting is the secret sauce. A few strands of bistro or fairy lights between palms instantly shrink a space visually. Add three ground-level up-lights behind the arch to warm the couple’s silhouette.
Sound matters more than people expect. A single Bluetooth speaker in a sandbag works great for vows and first songs. I hid my speaker under a low blanket near the arch and ran music from a phone on airplane mode. Perfect audio, no tech crew.
Unique angle: consider low lounge clusters for cocktail hour — a small grouping of a woven rug, two poufs, and a low stump side table reads cozy and invites conversation. It fills space and gives photographers a great moment.
Final ugly truth roundup:
- White-only décor washes into sand. Add warm woods and texture.
- Open flames fail on windy days. Use protected candles or LEDs.
- Too many scattered small items = sparse look. Group, don’t sprinkle.
Where I shopped: Etsy for a custom driftwood sign, Wayfair for folding wooden chairs, local coastal boutiques for shells and vintage glass. For quick, inexpensive lighting and LED candles, search Amazon with my tag (theoceanvows) — I used that for lanterns and battery candles and they lasted the whole night.
Wrap-up: The trick is contrast and anchoring. Pick one statement piece, group smaller items into intentional vignettes, and layer textures in three planes — ground, eye level, and overhead. Do that and a small beach wedding looks deliberate, not empty.