
My cousin’s ceremony started as a Pinterest dream and ended in a tangle of blown-out napkins. Figuring out how to diy beach wedding decor taught me two things fast: simplicity wins, and wind is the boss.
This guide shows exactly how to diy beach wedding decor that looks coastal, not cheesy. I’ll walk you through ceremony pieces, table layers, bridal practicalities, and the little finishes that read luxe. Budget: expect to spend about $500–$1,500 for core décor if you DIY, with some splurges for rental pieces.
Think barefoot-luxury, neutral palettes, and tactile layers: raw linen, driftwood, glass, and local blooms. This approach suits intimate elopements, micro-weddings, or couples who want a destination-feel on a budget. Lately I’ve seen more people choose sustainable materials and local florals over bright tropical props — it photographs better and feels curated.
1. Set the Scene: Ceremony Arch and Aisle Styling
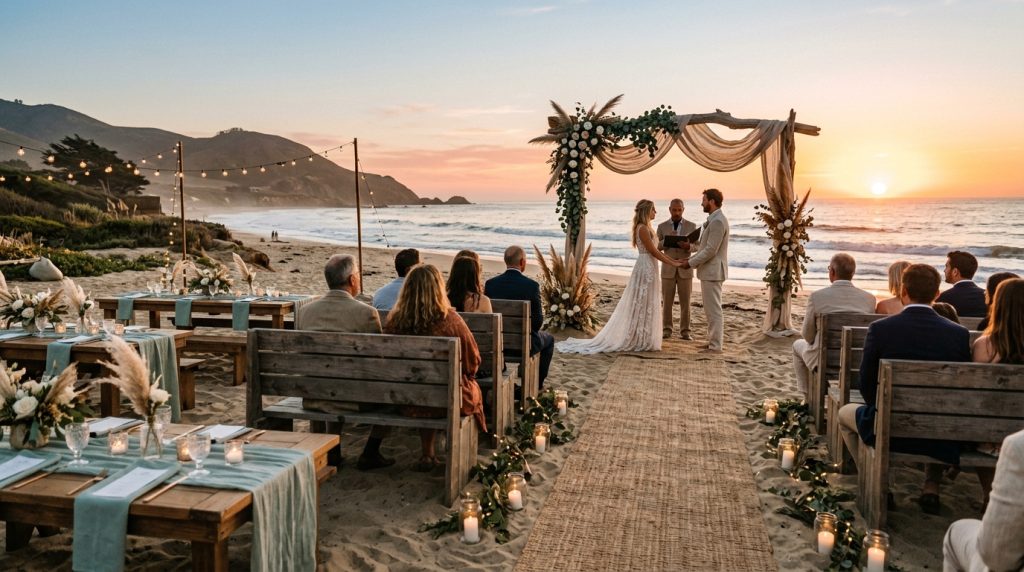
Start with a simple silhouette. A driftwood arch or an open square made from cedar looks natural against the sea.
Don’t drape too much fabric. One raw-linen panel (about 3–4 yards) on one side reads intentional. I used a 90″ linen panel in “oat” and it photographed like a cloud. (Linen panels, Amazon — theoceanvows — ~$28.)
Anchor everything. The ugly truth: even well-staked arches can tip in a gust. Use sand-sack weights or tie to buried rebar. I used 10–15 lb sand bags hidden behind a low dune — cheap and invisible.
For the aisle, skip individual chair bows. Instead, use low bundles: a mason jar with a short eucalyptus sprig tied to a small wooden peg. It’s tidy, wind-resistant, and looks like it belongs there.
2. Layer Texture with Coastal Table Décor
Coastal = tactile, not themed. Start with a neutral base: raw linen runner (3’x72″) over weathered wood tables. Add a narrow strip of jute or braided seagrass for texture.
Centerpieces should sit low. Think glass hurricane vases (12″ high) with a pillar candle and a nest of shells or sand at the base. I bought an affordable set of 12″ glass hurricanes that look like blown glass. (12″ hurricanes, Amazon — theoceanvows — ~$35/set.)
Use local greens (eucalyptus, olive) and one focal flower per arrangement. Protea, anthurium, or native blooms read modern and survive the salt air. Fake florals can work — choose high-quality stems with wired branches.
Place settings: keep them simple. Neutral chargers, hand-torn recycled paper menus, and a shell or tied tag as a place card. The hand-torn edge looks artisanal and won’t fly away like a loose card.
Ugly truth: bright plastic signage and neon colors read gimmicky on the sand. Stick to muted blues, greens, creams, and driftwood browns.
3. Dress for Sand and Wind: Bridal Look Essentials
Sand changes everything. Block heels sink. Flowy skirts drag. Opt for a dress with movement that won’t catch every breeze.
Hair: low chignons or loose waves pinned on one side. I used small combs with wired shells that stayed put through the ceremony. (Shell combs, Etsy shop — I found mine local at a coastal market for $12.)
Makeup: matte finishes and a tiny amount of waterproof mascara. SPF-based primers will help skin hold up under sun and sea spray.
Groom and party: lightweight linens in natural tones. Skip curly ties and heavy jackets for a breezy linen blazer or rolled sleeves.
Ugly truth number two: film-style windblown hair looks great in movies. In reality, people squint and run a hand through their face repeatedly. Plan hair and pins accordingly.
4. Finish with Florals, Favors, and Final Details
Florals: choose salt-friendly foliage (eucalyptus, grasses) and strategic blooms with sturdy stems. Store bouquets in coolers with ice if it’s a hot day.
Favors: think utilitarian — sunscreen tubes, small jars of local jam, or dried lavender sachets inside kraft boxes. Tie with twine and a simple tag.
Lighting: battery-powered LED candles + solar fairy lights = magic after sunset. Use small lanterns with sanded edges for warmth.
Stationery: print on heavyweight recycled paper and laminate or seal with a light coat spray to keep wind and moisture at bay. Or use a single welcome sign on foam core (less fiddly than multiple paper pieces).
Ugly truth number three: shells everywhere isn’t automatically “coastal”—it can read kitschy. Use shells sparingly as accents, not anchors.
5. Practical Extras: Weather-Proofing & Low-Key Luxe
Buy a few key tools: sand anchors for tents, clear fishing line for securing décor, heavy-duty double-sided tape, and a handheld cooler for florals.
I picked up a pack of sand anchors and a 50-ft spool of clear pre-stretched fishing line on Amazon (affiliate: theoceanvows) for about $25 total. They were lifesavers.
Rent big-ticket items like a clean wooden arch, low tables, or a portable sound system if you can. Those items give a curated look without the long-term cost.
Quick checklist: weights for structures, low centerpieces, neutral linens, local greens, battery lights, and one statement piece (arch or ceremony runner).
If you want my exact Amazon picks and the linen runners I recommend, I made a short list with images and links (affiliate tag: theoceanvows). These are the things I actually used or tested on the beach.
Closing thought: the best beach décor reads effortless because it respects the place. Keep shapes simple, textures natural, and let the ocean be the loudest element. That’s how to diy beach wedding decor that feels coastal, not cheesy.