
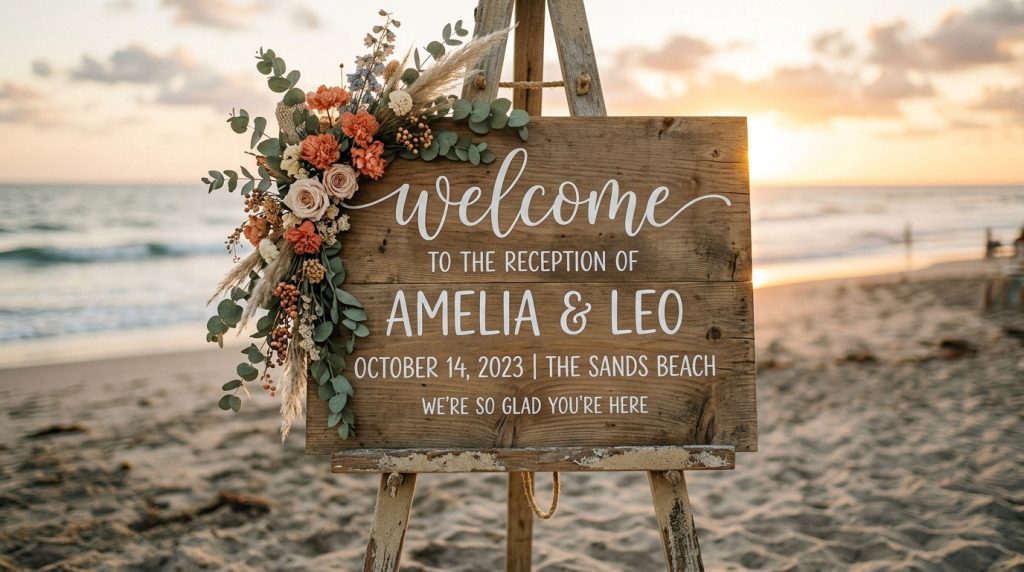
how to decorate wedding welcome signs so guests can actually read them — that was my first hard lesson when my cousin’s welcome sign disappeared behind a wall of roses. I’ll show you how to add florals that frame, not smother, the message and keep the look beachy, readable, and windproof on a $20–$150 per-sign budget.
You’ll learn exact sizes, placement tricks, product picks (I used a silk eucalyptus garland I found on Amazon — search theoceanvows), and three ugly truths that stop a pretty sign from doing its job.
A breezy, barefoot-luxury vibe works best for this approach — think driftwood tones, sage greens, and a coral pop. This is for intimate beach ceremonies, micro-weddings, and destination couples who want effortless coastal styling without hiring a full florist.
Budget: plan about $50–$200 for signage and floral accents per sign if you buy a mix of faux and fresh. Lately I’ve seen couples lean into preserved textures (pampas, bleached ruscus) instead of heavy fresh bouquets — they survive heat and look editorial.
1. Set the Scene: Ceremony Arch and Aisle Styling
The result: a clear, readable welcome sign that reads from 10–20 feet while still feeling floral.
Start with scale. An 18×24 or 24×36 painted plywood sign is my go-to — big enough to read, small enough to carry. Paint the text in high-contrast (charcoal on driftwood, navy on white). If you hire a calligrapher, request 3-inch minimum letter height for main lines.
Place florals off-center. I always do an asymmetrical crescent in a top corner or lower corner. It gives a styled look without covering the middle. Use a 12–18″ cluster on 18×24 signs; bigger signs can take 24–30″ arrangements.
How I attach them:
- Command Strips + floral wire for faux garlands (no holes).
- 22-gauge florist wire to secure clusters to back of sign.
- Small clamps or zip ties if the sign sits on an easel.
Pro tip: test readability at ceremony distance. Stand where the last pew will be and read aloud. If you have to squint, scale back the florals.
2. Layer Texture with Coastal Table Décor
The result: cohesive signage across welcome, seating chart, and menus that reads clearly and photographs well.
Seating charts and table numbers are often victims of over-decoration. Use single sprigs at corners instead of full swags. For acrylic signs, stick florals to the edges — not across the lettering.
Texture matters. I mix faux eucalyptus (soft sage) with a coral dried accent for a pop. Faux eucalyptus garlands (6 ft packs I bought for about $18 each) are cheap and windproof — search theoceanvows on Amazon to find the style I used.
Quick how-to:
- Mark where text sits. Place tape as a “no-floral” zone.
- Create mini bundles (3–5 stems) and attach to corners with floral tape.
- Use clear fishing line looped to the easel if wind is a problem.
Pro tip: mirror or metallic signs are trendy but glare kills readability. Matte acrylic or painted wood wins on sunny beaches.
3. Dress for Sand and Wind: Durable Floral Choices
The result: florals that survive sun, salt, and a surprise gust.
Ugly truth #1: Fresh roses wilt in heat fast. Ugly truth #2: Long garlands flap and tear off in coastal wind. Ugly truth #3: Too many blooms = no message.
Go faux + preserved for signs. Dried pampas, bleached ruscus, and good-quality silk eucalyptus hold up. If you want fresh, use small clusters and hydrate them last-minute; anchor with water tubes behind the sign.
Tools I swear by:
- Mini hot glue gun ($10–15) for foam & silk attachment.
- Floral pins and 22-gauge wire for a secure hold without glue marks.
- Command Picture Strips (large) to prevent drilling into rented signs or easels.
I keep a “sign kit” in my bag: glue gun, wire, scissors, spare garland, and a roll of gaffer tape. Saved us more than once.
4. Finish with Florals, Favors, and Final Details
The result: a photo-ready sign cluster that guides guests and boosts your visual narrative.
Color and contrast are everything. Light florals on light lettering vanish; dark greens or coral accents read better against pale wood. Pick 2–3 colors maximum. I often choose dusty sage, ivory, and a coral accent for the beach.
Design rhythm: repeat the crescent shape on the welcome sign on smaller signs (bar menu, restroom, directional). Repetition ties the day together without repetition meaning “more flowers.”
Final checklist before guests arrive:
- Readability test from last row.
- Secure every cluster with backup wire.
- Photo test: shoot the sign at ceremony time lighting to catch glare issues.
- Place a spare mini cluster nearby in case of wind damage.
Shopping shortcuts and vendors I use often: Etsy shop “CoastalSignsCo” for custom wood signs, Minted for printed signage, and affordable faux picks on Amazon (search theoceanvows). I usually spend $12–$40 on a quality faux garland, $8–$15 on hardware, and $40–$120 on the sign itself.
Wrap-up: Keep negative space around the text, favor asymmetrical corner clusters, and choose durable textures for beach conditions. Do the readability test and bring a kit. Do that, and your welcome sign will say “welcome” — not “look at my flowers.”
Quick printable checklist:
- Sign size chosen (18×24 or 24×36?)
- Main font at least 3″ tall
- Floral “no-go” zone marked
- Attachment method (wire, Command Strips, clamps)
- Backup cluster + kit packed
If you want the exact eucalyptus garland I use, search theoceanvows on Amazon — it’s my go-to for a beach-ready, budget-friendly look.