
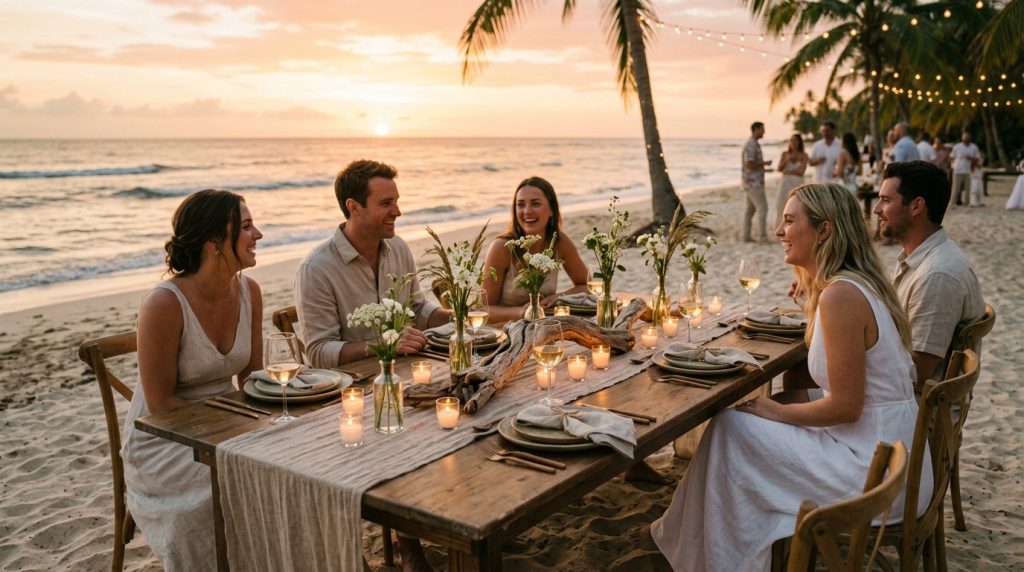
Figuring out how to decorate a wedding reception without overcrowding tables was the single trick that made our beach reception feel luxe on a shoestring. I wanted the tables to breathe — a few meaningful pieces instead of a million tiny things.
You’ll learn practical layouts, what to buy (and what to skip), and how to get the same airy coastal look for roughly $500–$1,200 in core décor. This guide suits intimate elopements, micro-weddings, and couples who hate clutter but love texture.
1. Set the Scene: Ceremony Arch and Aisle Styling
The ceremony backdrop sets the visual tone so the reception tables can be simpler.
We used a driftwood arch built by a local carpenter. It cost $250 and needed no additional fabric. The arch’s texture did the heavy lifting so table decorations stayed minimal.
Ugly truth: arches covered in too much fabric read as “wedding tent” on a beach. Let the natural elements — wood, rope, pampas — be the feature.
For the aisle, skip individual pew markers. Place two statement lanterns or a single row of low concrete planters at the entrance. One bold piece per sightline beats five tiny things that blow away in the wind.
2. Layer Texture with Coastal Table Décor
The trick is one horizontal layer + one vertical pop. Not both.
Start with a neutral linen runner (I paid about $18 each on Amazon) and a woven charger. One runner across a 6-foot table keeps a long line without patterns colliding with plates.
Center idea: a 3-foot driftwood piece, or a wooden tray, with three small bud vases and two tea lights. That’s it. I used 2-ounce glass bud vases that were $1.50 each. They hold single stems — eucalyptus, billy balls, or a short spray of local greenery.
Ugly truth: clustering ten votives looks pretty in photos but becomes hot, smoky, and messy by hour two. Fewer candles, placed in windproof glass, are safer and cleaner.
Size note: for 60” round tables use a centerpiece roughly 10–14” wide and no taller than 12” to keep conversations easy. For rectangular tables, repeat small groupings every 36–48 inches rather than one massive centerpiece.
3. Let Negative Space Be Your Décor
Negative space is a conscious design choice, not laziness. It’s the single move that transforms crowded tables into editorial spreads.
Pick a focal point per table: one shell, one small vase, or one place-card object. Leave the rest of the table quiet. Guests notice quality over quantity.
Unique angle: use trays or shallow wooden boxes to group elements. That containment reads intentional and keeps items from blowing across the sand.
Ugly truth: too many little favors and place-card trinkets create visual noise and clutter guests’ plates. Make favors optional on a welcome table instead.
4. Dress for Sand and Wind: Practical Styling That Still Feels Elegant
The wedding dress and table linens have to withstand beach conditions.
I swapped heavy trains for a chiffon skirt. It flowed in photos and didn’t drag sand into the cake. For linens, avoid thin polyester that flaps. Midweight linen blends weigh down enough in a breeze.
Hair and makeup: low buns and textured spray. Avoid loose updos unless you want hair in your mouth during the vows.
Ugly truth: real wind will rearrange your perfectly placed table décor within ten minutes. Use museum clay or clear adhesive dots under light objects and wire votive holders so they don’t travel.
5. Finish with Florals, Favors, and Final Details
Choose one floral statement and echo it subtly.
We used dried pampas and single white protea mixed with local greenery. That one motif appeared in boutonnieres, the arch, and tiny bud vases. The repeated element ties the whole space together without adding items.
Menus and place cards: printed on heavyweight kraft or recycled paper placed flat on the charger. Flat signage keeps the table clean. If you want a name token, a small shell or stone with a stamped name looks luxurious and is usable as a keepsake.
Favors: set on a separate low table near the exit. Guests can grab one if they want. This keeps place settings minimal.
Ugly truth: foil-stamped menus and oversized signage look great in rainy lighting but cost a lot and clutter the table. Simple typography on textured paper reads elegant and costs less.
Quick practicals for comfort:
- Use battery-operated tea lights in windproof glass for safety.
- Provide gaze direction: small signage telling guests “Please leave centerpieces as is” helps (trust me, Aunt Marie will rearrange if she can).
- Rentals: wooden chargers and linen runners are cheaper to rent than buy for one night.
Shopping notes & my go-tos
- Linen runners and small bud vases: find matching sets on Amazon (search “linen table runner” and “glass bud vases” — affiliate tag: https://www.amazon.com/s?k=linen+table+runner&tag=theoceanvows). I used $18 runners and $1.50 vases.
- Driftwood and handmade chargers: local artisans or Etsy — I bought my chargers for about $3–$6 each during a summer sale.
- Windproof votive holders: Pottery Barn and Wayfair have durable glass options.
Final thought
Less is a strategy, not an aesthetic accident. Choose one strong texture, one repeated floral, and one functional lighting plan. Keep place settings clean and let the ocean be the backdrop. Our guests kept saying how peaceful the tables felt — that’s what you want: space to eat, talk, and actually see the view.
If you want, tell me your guest count and table sizes and I’ll sketch an exact centerpiece plan with shopping links and a budget estimate.