
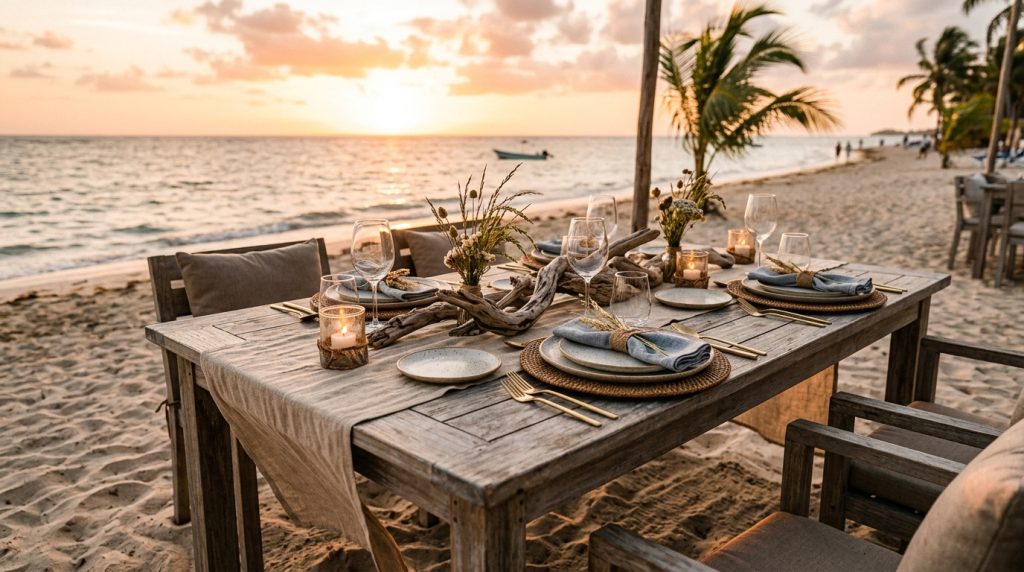
I learned how to diy wedding table decor the hard way when our rehearsal dinner looked like a craft-store explosion. Guests asked where the professional decorator was. I spent $120, an afternoon, and one very patient friend to make it look custom.
You’ll learn how to create layered, coastal tables that read bespoke — not last-minute. Budget ranges: starter kit under $200, polished look for $500–$1,500. Practical for intimate elopements, micro-weddings, and destination celebrations.
This is for the barefoot-luxe couple who wants neutral, textured tables that stay put in wind and sand. I’ve noticed couples leaning into driftwood, seagrass, and muted terracotta tones instead of all-white setups. It ages well in photos and real life.
1. Set the Scene: Ceremony Arch and Aisle Styling
Result: tables that feel like they belong to the place.
Match your table palette to the ceremony. If your arch is raw driftwood with seagrass swags, bring that same tone to centerpieces and chargers. I once swapped a white floral garland for a long seagrass runner on the aisle and the whole wedding felt intentional.
Pro tip: reuse aisle pieces as table anchors. Small bundles from the aisle—sprigs of eucalyptus or tied shells—work perfectly in low bowls on tables. This saves money and keeps the visual story consistent.
What to buy: lightweight driftwood bundles ($10–$25/pc from Etsy), bleached seagrass swags ($12–$20), and 3–4 weighted glass hurricanes (I bought 6 on Amazon for $18 each — affiliate theoceanvows).
2. Layer Texture with Coastal Table Décor
Result: rich, custom layers without expensive florals.
Start with a textured base. Linen runners in warm sand or oyster (108″ × 16″) make everything look curated. I paid $28 per runner that held up to sand better than cheap polyester.
Next, chargers. Rattan or bamboo chargers hide gritty edges and feel handmade. I found 12″ rattan chargers for $3–$6 each at HomeGoods and Amazon.
Centerpieces: aim low and layered. A 3-piece vignette — a weighted hurricane, a small driftwood cluster, and a low floral posy — reads designer. Use one 6–8″ posy per 6–8 guests. For flowers, mix filler (wax flower, seeded eucalyptus) with one focal bloom (garden rose or protea).
Napkins & menus: fold napkins on chargers and tuck a sprig and handwritten menu under a napkin ring. Sea-glass or shell napkin rings are inexpensive and photographed beautifully.
Buy list (ballpark): linen runner $25, rattan chargers $40/6, weighted hurricanes $18 each (affiliate theoceanvows), small floral clusters $8–$15 each.
3. Dress for Sand and Wind: Bridal Look Essentials
Result: nothing blows away or looks staged in real conditions.
Ugly truth: long, sheer ribbons look stunning on Pinterest but become a tangle in the wind. Replace them with short leather ties or wired ribbon that you trim.
Use weighted bases. Heavy chargers, flat stones, or sand-filled glass jars keep linens and place cards from flying. I used sand inside clear votives for $6 each and they worked like anchors.
Menus and place cards: opt for thicker stock (110–140 lb) so they don’t curl. Clip cards to small driftwood holders or shells glued to cardstock. I found shell place cards at a coastal home décor shop during a summer sale — they felt personal and cost $1–$2 each.
4. Finish with Florals, Favors, and Final Details
Result: cohesive close-ups and guest moments that feel curated.
Flowers: keep them local and seasonal. A few stems per arrangement keeps costs down and gives a natural, beachy look. Wrap stems in twine or unbleached muslin for texture.
Favors that photograph well: mini honey jars with a tiny shell tag, or custom salt samplers in kraft bags. They double as place cards. Price idea: $2–$4 per favor.
Lighting: battery votives in sand-proof holders and low flameless candles work best. String warm white café lights above tables for golden-hour glow.
Final assembly trick: set up an hour before guests arrive. Have a “drop zone” of labeled baskets so nothing gets misplaced in wind or on uneven sand.
5. Ugly Truths: Avoid These DIY Table Failures
Result: skip the common traps that make DIY look amateur.
Too-tall centerpieces. They block sightlines and topple in wind. Keep centerpieces under 12″ tall.
Glass without weight. Pretty glass will slide in sand. Add sand or gravel to vases, or use weighted hurricanes (affiliate theoceanvows).
Over-accessorizing. Using five different textures and six patterns reads messy. Pick two textures (linen + rattan) and one accent (metal or shell).
Cheap battery candles. They often die mid-reception. Buy reliable brand votives with remote control and spare batteries.
Last-minute glue gun decor. Nothing ages worse than visible hot glue. Invest in twine, floral tape, and discreet wire for cleaner finishes.
Wrap-up: three quick action steps
- Buy one textured runner, six rattan chargers, and 4 weighted hurricanes (starter kit: under $200).
- Design one three-piece centerpiece and test it outdoors a week before.
- Build favors that double as place cards.
If you want my starter list of exact Amazon picks (runners, chargers, hurricanes, and reliable votives) I compiled everything into a simple kit — you can find it with my affiliate tag theoceanvows. No spam. Just the things I used that survived sand, wind, and a very opinionated aunt.