
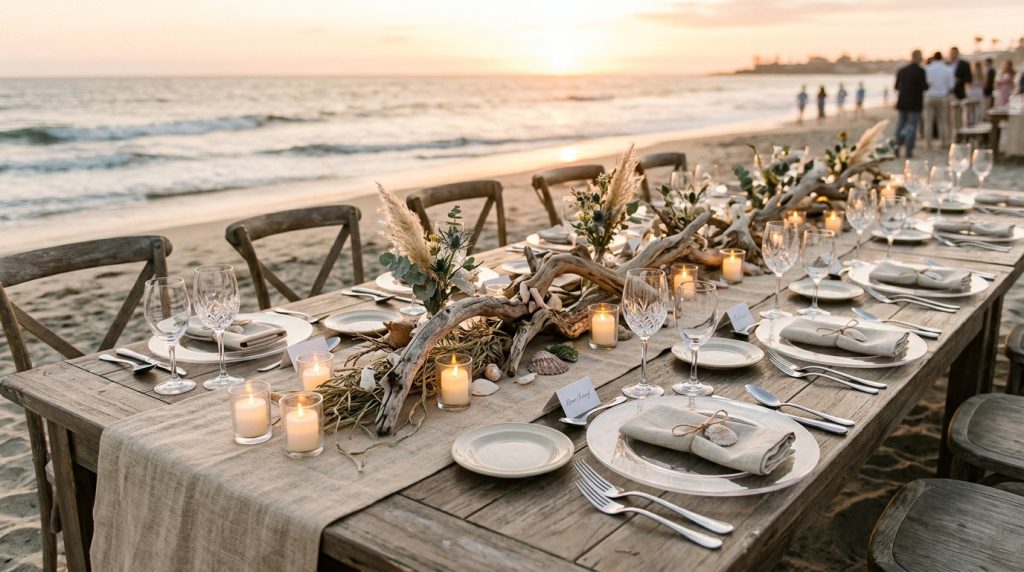
I learned the hard way how to diy wedding table decorations on a windy beach — my first trial had a centerpiece that ate half a place setting and candles blown out before dinner.
Here’s what you’ll learn: how to build beachy tables that look layered and luxe but still leave room for dinner plates, for about $500–$1,200 for core décor (table runners, centerpieces, votives, place cards). I’ll share exact sizes, product picks I’ve used, and the ugly truths nobody posts on Pinterest.
This approach works for boho coastal, barefoot-luxury, or minimalist shoreline vibes. It’s ideal for intimate elopements or micro-weddings where every inch of table matters. Lately I’ve noticed couples skipping big arches for driftwood installations and favoring narrow, low tablescapes — cleaner, more usable, and way less windy drama.
1. Set the Scene: Ceremony Arch and Aisle Styling
Start by anchoring the visual story. A driftwood arch or simple wooden frame sets a coastal tone without competing with table décor.
Use fabric panels (lightweight linen or muslin) anchored with clips and discreet sandbags. These look romantic and stop the wind from turning fabric into sails.
Aisle markers should be narrow: single stems in glass bottles hung at an angle or small bunches tied to wooden stakes. They hint at the table style without visually overcrowding the reception area.
Ugly truth: tall, floppy ceremony pieces create wind chaos that carries sand onto your tables. Keep it low and anchored.
2. Layer Texture with Coastal Table Décor
This is the heart of learning how to diy wedding table decorations while leaving room for plates.
Rule of thumb: centerpieces should be under 8″ tall and no wider than 10–12″ across on rectangular tables. That keeps sightlines clear and leaves a 6–8″ perimeter for chargers and plates.
What to build:
- Linen runner (2–3″ narrower than table width) down the center rather than full tablecloths. Runners show wood or rattan/wood-grain and reduce laundry.
- Cluster three low elements: a small driftwood log or tray, 2–3 bud vases (1–2 stems each), and 2 votives. This creates visual interest with minimal footprint.
- Use shallow glass bowls filled with sand and a single large shell for texture. Sand anchors pieces so wind won’t blow them off the table.
Product picks I’ve used:
- Acrylic chargers (10.5″) — they read clean and don’t visually bulk up the setting. Found a 6-pack on Amazon for about $24.99 (affiliate: theoceanvows).
- Battery flicker tea lights, waterproof votive holders — lifesavers at $12–$20 for a 24-pack (affiliate: theoceanvows).
- Linen runners (12″x108″) in warm sand or oyster gray — rent if you can, or buy a set for ~$35 each.
Ugly truths: chargers are often too big for intimate tables. And tall candles look romantic until they start dripping sand into everything.
Practical layout tip: before anything permanent, physically place dinner plates and glasses on one test table. Mark guest zones with masking tape. Then style within the remaining space.
3. Dress for Sand and Wind: Practical Styling Tricks
Fashion for tables is about survival, not just looks.
Use tablecloth clips and small bag weights beneath runners. I keep flat, stainless napkin rings and tuck napkins under plates so wind can’t grab them. Weighted napkin clips (or wooden clothespins) double as place-card holders.
Choose unbreakable or weighted vessels near edges. I swapped thin glass for squat hurricane holders; they block wind and survive the sand shuffle. For candles, use enclosed hurricanes or battery-powered pillars. I keep spare batteries in a snack-size resealable bag.
Ugly truth: white linens stain instantly from sunscreen and sand. Bring backup runners or plan for table-top protectors.
4. Finish with Florals, Favors, and Final Details
Flowers should be resilient — think protea, eucalyptus, ruscus, and pomegranate branches for texture. Use single-stem bud vases to stretch florals across tables without crowding.
Favors that double as place markers save space. Shell place cards, small jars of local sea salt, or personalized jam jars sit beside the plate rather than on top of it. I found a batch of shell place cards at a coastal home décor shop during a summer sale; they were $1.25 each and felt custom.
Lighting: string lights overhead, not on the table. Anchor them with tent stakes and consider LED bulbs that don’t attract bugs as much. Citronella torches around the perimeter help, but test them — some guests hate the smell.
Unique angle: use driftwood fragments as a continuous runner base. Lay slim pieces centerline, then nest votives and bud vases along them. It looks editorial and occupies very little horizontal space.
Ugly truth: battery candles die mid-toast. Test every set the night before and stash spares.
Quick product roundup (tested):
- Acrylic chargers, 10.5″ set — Amazon (affiliate: theoceanvows)
- Waterproof battery tealights, 24-pack — Amazon (affiliate: theoceanvows)
- Linen runners in sand and oyster gray — Etsy or Amazon (affiliate: theoceanvows)
- Small glass bud vases, mixed set — local craft store or Amazon (affiliate: theoceanvows)
- Tablecloth clips and runner weights — Amazon (affiliate: theoceanvows)
Final checklist before guests sit:
- Physical plate test on one table.
- Batteries installed and spare set ready.
- Napkins clipped/tucked under plates.
- Centerpieces under 8″ tall, max 12″ wide.
- Pathways and service access clear for servers.
If you want my exact Amazon picks and the quick starter kit I set up for our beach rehearsal dinner, I keep them in one list — feel free to check it out (affiliate: theoceanvows).
You’ll get a beachy, layered tablescape that photographs beautifully and actually works at dinner. That’s the real win.