
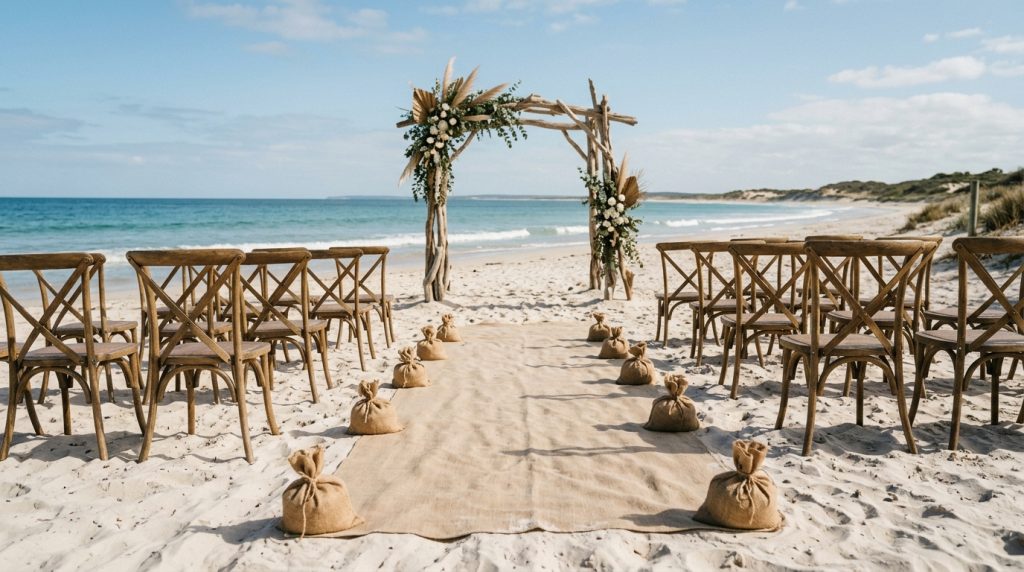
how to set up a beach wedding aisle that survives wind, waves, and guests — that was my brief when my sister insisted on a barefoot ceremony on the Outer Banks. We needed beauty that wouldn’t blow away, sink, or look messy 10 minutes before vows.
In this guide I’ll show you the exact anchoring tricks, materials, and small purchases that saved our photos and nerves. Budget: around $500–$1,500 for the core aisle and arch setup depending on DIY vs vendor help.
We wanted barefoot luxury with a whisper of boho coastal — neutral linens, driftwood textures, and low, local blooms. This plan suits intimate elopements, micro-weddings, and budget-conscious couples who still care about pretty photos.
I’ve noticed couples favoring driftwood arches and dried-flower palettes over glossy white structures. Also: sustainable favors and locally foraged florals are trending for 2025.
1. Set the Scene: Ceremony Arch and Aisle Styling
Start with the thing guests see first: the arch and the cleared aisle. The result should read sturdy and natural, not “about to take flight.”
Ugly truth: lightweight arches and single-stake signs topple first. We used a driftwood arch (3×2 ft frame) buttressed with 3/8″ rebar driven through 2×4 bases. Rebar (3/8″ x 36″) is $2–$4 each at big-box stores and saves you dozens on rental fees.
For pure wind protection, hide 10–25 lb sandbags inside jute baskets at each arch leg. I wrapped 12″ x 18″ contractor sandbags in burlap and tucked them behind a planter — invisible, effective.
Aisle runner: full-length fabric runners look dreamy but flap. Instead, use a short natural linen runner (6–8 ft) centered at the altar for photographs. For the guest path, opt for 18–24” wide jute or seagrass rugs laid in overlapping tiles. Anchor tiles with landscape spikes or large U-shaped rebar pins bent over the rug edge.
Signs and aisle markers: use glass bottles filled with stones and tied with twine, then stake the bottle necks to the sand with stainless steel garden stakes. Cheap, coastal, and they don’t fracture in a gust.
2. Layer Texture with Coastal Table Décor
You’ll create cohesion between the aisle and reception by echoing textures and colors.
Pick 2 neutral tones and 1 accent — e.g., oyster white, driftwood gray, and terracotta accent. I used oyster napkins, driftwood chargers, and a single terra-cotta earthenware vase down the center of the aisle for continuity.
Ugly truth: tablecloth hems collect sand and look dingy. Instead, use raw-edge linen runners on tables or low wooden boards for centerpieces. Stabilize low centerpieces with rocks in glass vases so stems don’t topple.
Candles and lanterns: use battery-powered wax candles (safer in wind) inside glass hurricanes weighted with sand at the base. I bought a pack of battery pillars from Amazon and taped the battery compartments with marine-grade tape so salt spray wouldn’t corrode them.
3. Dress for Sand and Wind: Bridal Look Essentials
You want photos that look effortless, not like you’re wrestling a veil.
Choose flowy, substantial fabrics — crepe, heavier satin, or chiffon with weight at the hem. These move beautifully in the breeze without turning into the Bride Kite.
Ugly truth: long trailing veils tear or tangle in beach wind. Opt for a birdcage veil, shorter fingertip veil, or a wired comb veil that anchors into a chignon. I clipped in a 14″ comb veil and used extra bobby pins and a small floral hairpiece to hide them.
Shoes: go with sturdy espadrilles, leather sandals, or barefoot alternatives. I recommend Vionic or TKEES for style + stability. For barefoot brides, bring soft fabric heel protectors for the first aisle walk so heels don’t sink when needed.
Hair & makeup: salt air frizzes curls and melts heavy makeup. Book an artist who uses matte, waterproof products. Pack a small kit (clear elastics, U-pins, travel hairspray) for touch-ups.
4. Finish with Florals, Favors, and Final Details
Florals must be heavy in the base and wired. Low clusters held in weighted vessels read better than tall, fragile arrangements.
Use local blooms and dried stems. Dried pampas, seeded eucalyptus, and protea survive salt spray and look editorial in photos. I wired every stem with floral tape and used florist’s gel (water-based) in vases to keep cut flowers hydrated longer in heat.
Favors: seed paper, tiny succulents in cork pots, or shell sachets from a coastal home décor shop make better long-term gifts than fragile glass.
Ugly truth: confetti that isn’t biodegradable becomes garbage — and a venue problem. Use biodegradable petals or rice paper confetti.
Practical detail: set a “wind plan” bag backstage with clips, extra sandbags, zip ties, marine-grade bungee cords, and a roll of gaffer tape. You’ll thank me when a gust rearranges your aisle signs 15 minutes before walking down it.
Quick checklist before walk:
- Rebar and sandbags locked in place
- Runner edges pinned with U-pins or weighted seashells
- Chairs on compacted sand or plywood strips under legs
- Backup bouquet wrapped in waterproof paper
Ugly truths recap (because someone’s got to say it):
- Pretty runners flap and look sloppy unless pinned.
- Lightweight props become hazards in gusts.
- Florals wilt faster in salt air; wire and weight them.
My three favorite buys that saved our day: a pack of 3/8″ rebar from Home Depot, jute sandbags I found on Etsy for $12 each, and a set of battery wax pillars from Amazon (affiliate tag: theoceanvows). They’re small costs that dodge disaster.
If you want, I can make a printable materials list and a vendor script you can hand to your beach coordinator. It’s the exact list I handed my sister’s venue manager — and yes, the photos looked like a dream.