
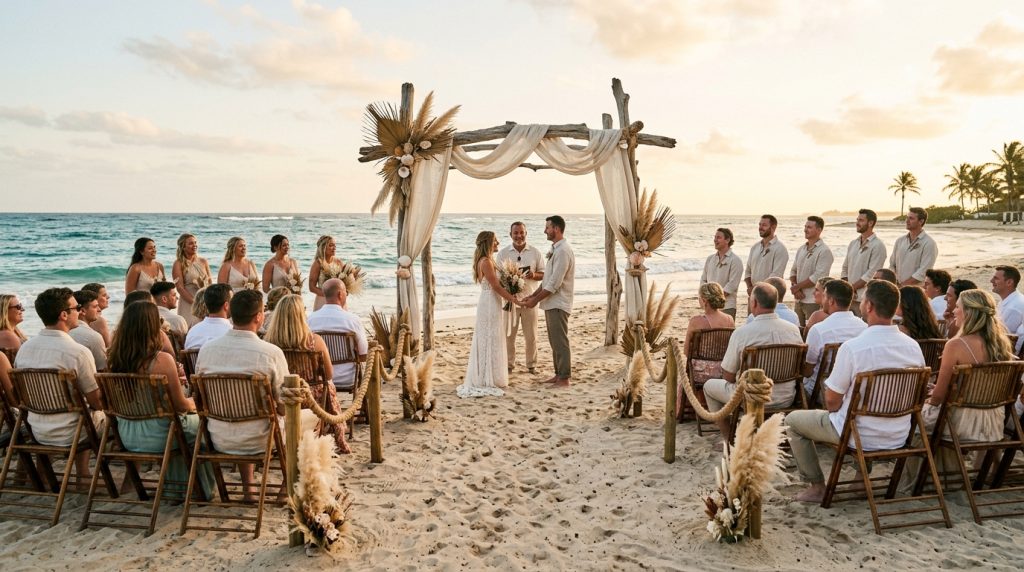
How to style a beach wedding altar without overdoing seashells starts with one rule: create a moment, not a museum display. I learned that the hard way when a friend’s “seashell extravaganza” looked clumsy on camera and the wind sent half the shells down the beach.
You’ll learn quick, sand-proof swaps for shell overload, a realistic budget (around $500–$1,500 for the altar and immediate styling), and where to spend vs. where to save so your altar reads coastal, not costume.
This look suits barefoot luxury, boho-coastal, or minimalist shoreline weddings. It’s built for intimate elopements and micro-weddings, or couples doing a weekend destination with tight décor budgets.
I’ve noticed couples moving away from all-white arches toward driftwood and tactile neutrals. Dried florals and woven textures are trending for 2025—great news if you hate polishing shells.
1. Set the Scene: Ceremony Arch and Aisle Styling
Start with a simple, sturdy structure. A 7–8 ft driftwood arch looks organic and photographs beautifully.
Anchor it. Use sand stakes or rebar driven and buried, then cover with a natural jute mat. Ugly truth: a pretty arch that isn’t properly anchored becomes a hazard in coastal winds.
Skip the shell curtain. Instead, wrap one or two corners with linen (almond or dune beige), a handful of dried palms, and a single clump of pampas grass. Keeps things light and motion-friendly.
Sizes & vendors: I rented a driftwood arch from a local prop house for $150; you can find similar pieces on Etsy (search “driftwood arch”) or West Elm for modern alternatives. Expect rental or purchase costs between $100–$400.
Aisle tip: mark the path with seagrass cones or rope lanterns. Use sand-friendly stakes (Amazon sells screw-in sand anchors — I use one set and add “theoceanvows” to my cart for affiliate options).
Ugly truth: piles of shells look homemade. Minimalism reads more luxe.
2. Layer Texture with Coastal Table Décor
If you have a welcome table or small signing table near the altar, keep it tactile, not tacky.
Choose a washed linen runner (soft gray or washed blue). I bought a sand-proof, waxed jute runner for $18 at Target; it wipes and survives tide-spray.
Swap shell centerpieces for small driftwood clusters, a single sculptural coral (faux to protect reefs), and a votive in a textured amber glass. Sequence pieces low to mid height so the altar stays the focal point.
Practical note: battery-operated LED candles with amber diffusers read like candlelight without melting. Ugly truth: real candles drip and attract sand.
Shops & buys: IKEA has affordable woven placemats; West Elm and CB2 have coastal glassware. Amazon options with the affiliate tag (theoceanvows) include cordless LED pillars and marine-grade cable ties for securing décor.
3. Dress for Sand and Wind: Bridal Look Essentials
Your altar styling should match the practical mood of your outfit.
Lightweight fabrics look and move better—chiffon, crepe, or silk satin blends. Heavy beading drags sand and shows every gust.
Hair and veil: forego a long cathedral veil that traps sand. A fingertip veil or silk scarf works. I pinned a few tiny bougainvillea sprigs into my cousin’s knot; they stayed put and picked up the palette.
Groom: linen blends, rolled sleeves, and barefoot sandals or loafers that won’t fill with sand. Ugly truth: formal shoes with sand equal regret.
Match color cues to the altar: if you used warm dried palms, add warm neutrals in attire to feel cohesive.
4. Finish with Florals, Favors, and Final Details
Florals should be drought-friendly and wind-proof. Dried palms, bleached ruscus, and a few hardy protea stems survive a stiff breeze and photograph well.
Keep blooms asymmetrical and anchored with floral foam hidden inside a wooden box or wrapped vase. Use marine-grade floral tape and cable ties—those tiny tricks keep arrangements from toppling.
Favors: skip shell keepsakes. Instead offer small pouches of local sea salt, custom matches in a kraft box, or seed packets. They’re beachy, useful, and won’t get mistaken for trinkets.
Vendor tip: rent vases and lanterns where possible. Rentals cut cost and reduce waste.
5. Create Motion, Not Clutter: A Minimal Movement Approach
The unique trick I love: design for movement. Let fabric and foliage flutter. A few suspended driftwood pieces or a macramé panel make soft shadows and motion-driven photos.
Avoid hanging rows of shells. Instead use one statement hanging element—macramé, a wooden hoop with dried grasses, or a slim wind chime. The eye needs a focal point, not twenty small ones.
Lighting: use uplights concealed in sandbags to wash the arch at golden hour. Solar stake lights along the aisle read romantic and save on cords.
Ugly truth: too many tiny details vanish in photos and only add setup headaches.
Common mistakes to avoid (short list)
- Over-shelling: shells pile up and look cheesy on camera.
- Under-anchoring: pretty pieces that fall = ruined photos and stress.
- Matching-everything: one or two coordinated accents beat a themed costume.
If you want a few product picks I’ve used: a waxed jute runner ($18, Target), marine anchor set (Amazon — theoceanvows), battery LED pillars (Amazon — theoceanvows), and a local rental for a driftwood arch. These small buys saved us setup time and kept the altar feeling effortlessly coastal.
Wrap-up: Keep the altar simple, tactile, and anchored. Choose a statement element, then let texture and movement do the rest. Do that, and your beach ceremony will read timeless instead of touristy.
If you want, I can sketch a simple shopping list and a 2-hour setup plan for your venue or suggest exact Amazon product links with my affiliate tag (theoceanvows). Which would help more: budget under $500 or a mid-range $1,000 set?