
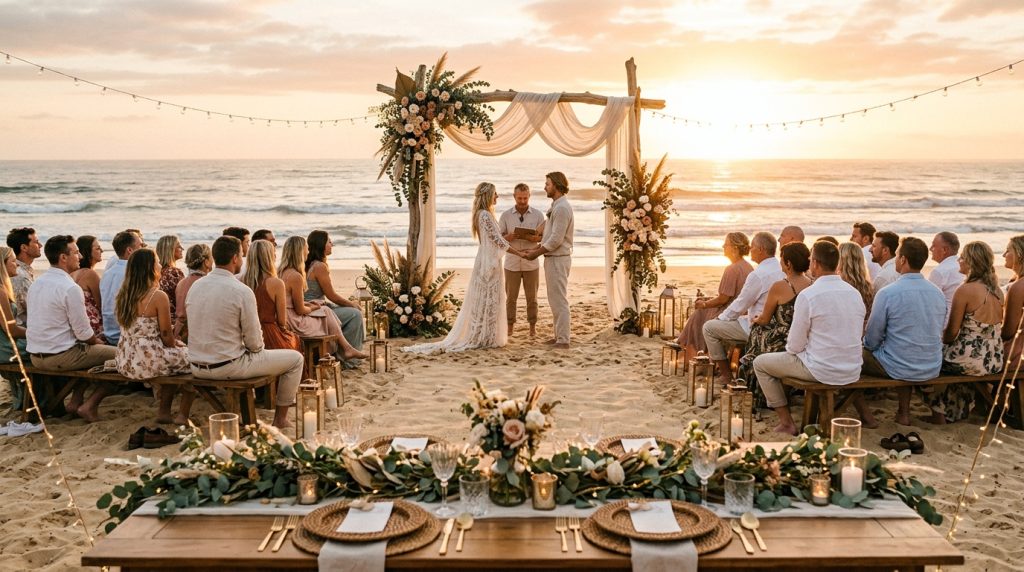
My cousin’s beachfront ceremony cost $2,100 and looked like a $12,000 wedding. The trick was knowing where to spend and where to fake it well.
If you want to know how to diy a wedding on a budget without it feeling thrown together, this guide walks you through the exact styling phases, what I bought (and why), and the ugly truths nobody advertises. Budget range: core décor for ceremony + tables under $1,500; total day with food and small rentals around $4,000–7,000 for a micro-wedding.
I was aiming for barefoot luxury — neutral linens, driftwood tones, sun-bleached greens, and texture over sparkle. Lately I’ve noticed couples shifting from pristine white arches to textured driftwood installations and more sustainable choices like reusable glassware and dried-flower accents.
1. Set the Scene: Ceremony Arch and Aisle Styling
Result: An intentional focal point that reads luxe from the back row.
Start with materials: a simple 8–10 ft driftwood or bamboo arch, a 6–8 ft linen or muslin drape, and a handful of weighted lanterns. I bought a DIY bamboo arch kit for $85 and sand-bagged the legs with canvas sandbags ($12 each). Driftwood is great if you can collect it; otherwise check Etsy sellers or local beach markets for pre-treated pieces.
Styling tips: Keep the palette coastal — oyster, sand, washed sage, and sun-bleached wood. Add texture, not more color. A single oversized linen drape and two eucalyptus clusters look more editorial than a dozen mismatched bouquets.
Hacks to save money: Skip a florist for the arch. Use a foam-free cable-tie method (I show this to friends: tie greenery to the arch, then hide ties with twine). Borrow a rug or use a natural jute runner instead of an expensive aisle runner — it photographs beautifully and hides footprints.
Ugly truth: Wind ruins loose petals and lightweight florals. Don’t plan delicate sprays without extra pins and weights.
2. Layer Texture with Coastal Table Décor
Result: Tables that feel curated, not cluttered.
Focus on three items per table: linens/runner, chargers, and a low centerpiece. I lean toward washed-linen runners (2.5–3 ft wide) layered over inexpensive oatmeal tablecloths. Rattan or bamboo chargers read coastal and are surprisingly cheap ($3–6 each on Amazon/Etsy).
Centerpieces: low eucalyptus garlands with a few dried protea or bleached palms. I scored a box of bulk eucalyptus from Afloral for about $40 and split it across five tables. Use unscented pillar candles in hurricane glasses (clear glass avoids looking kitschy).
Hacks: Buy linen napkins in bulk from DII or Amazon; you can dye them slightly with tea for a sun-bleached look. Use battery-operated fairy lights (search “warm LED string lights”) to get candle ambience without endless drip-wax cleanup.
Ugly truth: White tablecloths show every spill. Pick cream or sand tones to be forgiving.
3. Dress for Sand and Wind: Bridal Look Essentials
Result: Photos that feel effortless, not windblown disaster.
Go for fabrics that move well — lightweight silk crepe, chiffon, or linen blends. I recommended a tea-length linen dress to a bride who wanted barefoot ease; she danced all night and didn’t fight her hem.
Shoes: Platform sandals or espadrilles with ankle ties. They give height and don’t sink. I bought wedge espadrilles for $38 that looked custom.
Hair/Makeup: Opt for loose styles with pins and hairspray, not fussed-up updos. Windproof makeup means matte foundation and setting spray. Ask your stylist for a second, looser hairstyle option for photos at the waterline.
Ugly truth: Veils become a kite. If you want movement, use a short cathedral scarf pinned low, or go veil-free and use a statement hairpiece.
4. Light It, Sound It, and Keep People Comfortable
Result: A mood that feels intimate and effortless.
Lighting transforms a cheap rental tent into a magical room. String warm LED bistro lights for $20–40 a strand. Add solar lanterns or battery-flicker candles down the aisle for safety.
Sound: A good Bluetooth speaker and a simple mic for vows is all you need. I used a JBL portable speaker split across two stands and it filled a 50-person ceremony easily.
Comfort: Provide fans, bug spray stations, and a small basket of flip-flops. I had a guest say the flip-flop station was the best $75 I spent — people took them home.
Ugly truth: Power access can kill a DIY plan. Arrange a generator or charged batteries well before guests arrive.
5. Finish with Florals, Favors, and Final Details
Result: Small touches that make guests feel seen.
Florals: Mix fresh blooms for focal pieces and dried accents for filler. Dried grasses (bunny tail, pampas) add that coastal, editorial vibe with longevity. I bought dried stems from a local craft store and tied them into simple bundles for each place setting.
Stationery: Keep it simple. A printed itinerary on textured cardstock and a hand-lettered welcome sign (I used a small chalkboard with white paint pen) feels intentional.
Favors: Think useful — mini sunscreen tubes, local sea-salt jars, or a small bottle of limoncello from a local maker. I sourced shells at a coastal shop and used them as place-card holders — they cost me $12 for 30 and looked unique.
Ugly truth: Favors that aren’t useful become landfill. Choose one thing people will use that day.
Shopping checklist + closing note
- Arch kit or driftwood, linen drape, sandbags
- Rattan chargers, linen runners/napkins, battery candles
- Bulk eucalyptus/dried stems, string lights, Bluetooth speaker
- Flip-flops basket, sunscreen station, simple signage
If you shop on Amazon, a small way to support more free tips is to use links with my tag (example pattern: amazon.com/dp/ASIN?tag=theoceanvows). No pressure — just one easy way to keep these real, tested guides coming.
Final ugly truth: DIY saves money, but it costs time. Expect a few late nights and enlist a friend to be the on-site art director. Do that, and your beach wedding will look calm, curated, and completely you — without the last-minute “thrown together” vibe.