
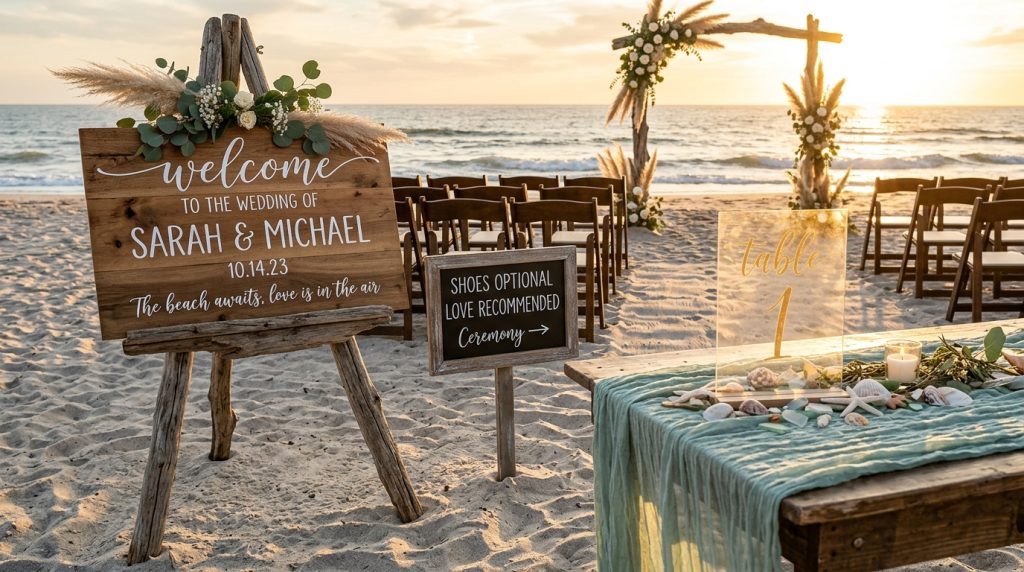
When I first learned how to make diy wedding signs for my sister’s beach ceremony, the welcome sign nearly blew into the surf. The result mattered more than the craft: guests needed readable, weatherproof, and venue-matching signs that looked intentional — not like a Pinterest fail.
You’ll learn step-by-step how to make signs that match a boho-coastal, minimalist shoreline, or nautical-elegant venue. Budget: expect about $150–$600 for a set of 4–6 quality signs, or under $200 to start if you DIY small. I’ll also point to a few products I used (search on Amazon with my tag theoceanvows).
Quick ugly truths (so you don’t repeat them)
- Wind will win. Lightweight foam core or unweighted easels = disaster.
- White paint looks perfect in photos but scuffs and shows sand.
- Gorgeous script fonts read terribly from 10+ feet on the beach.
- Cheap plywood warps in salt air if you skip sealing.
1. Set the Scene: Ceremony Arch and Aisle Styling
Goal: a large welcome/ceremony sign that reads well from the parking area and anchors your arch.
Materials I used: one 24″x36″ pine panel ($25), sanded and stained; 2×2 wood easel or driftwood leaner; exterior paint (Rust-Oleum Painter’s Touch), Oracal outdoor vinyl for lettering or vinyl transfer (if you have a Cricut).
How I did it: stain the wood to match your arch — I used a “weathered oak” wash to echo driftwood. Seal with two coats of exterior polyurethane. Cut lettering on vinyl (Oracal 651) with a Cricut Maker or order a custom vinyl decal from Etsy if you don’t own one. Apply using transfer tape, then mount to a weighted easel. Anchor the base with sandbags hidden in a woven basket.
Practical tips: choose a sans-serif or wide brush script, 4–6″ tall lettering for readability. If you want the driftwood look, source reclaimed boards from a local coastal salvage shop or Home Depot’s fence pickets and distress lightly.
Product note: I ordered a “Rustic Welcome Sign Kit” from Amazon and matched the colors — search the name with affiliate tag theoceanvows.
2. Layer Texture with Coastal Table Décor
Goal: table numbers, menus, and place cards that feel like they belong on the sand.
Materials: 4–6″ acrylic round numbers, wood slices (3–5″ for place cards), mini chalkboards, shells or seagrass runners.
DIY approach: for table numbers, mount small clear acrylic sheets (I used 6″x8″ plexiglass) on short wooden blocks and apply vinyl numbers. Menus can be printed on matte cardstock and slipped into linen napkin wraps or small driftwood holders. For place cards, drill a 1/8″ slit in thin wood slices and slot the card in; or glue a shell as a holder.
Why this works: acrylic reads crisp against sand and won’t soak up moisture. Wood adds texture and ties to driftwood arches. Keep colors muted: seafoam, sand, and low-contrast navy.
Buy tip: Oracal 651 vinyl, pre-cut wood slices from Michaels, and small acrylic sheets from Amazon (search “clear acrylic 6×8 theoceanvows”).
3. Dress for Sand and Wind: Bridal Look Essentials
Goal: signage that helps guests (and photos) — not a fluff list of do’s and don’ts.
Think beyond decor: signs for “Shoes Optional,” “Flip-Flops & Sunscreen,” or “Ceremony Begins at 4:30 PM” are lifesavers. Make them sturdy: mount to cedar stakes and bury the stakes deeper than you think.
Ugly truth: ornate calligraphy looks romantic until the wind ruffles napkins and the script is unreadable. Use bold, slightly condensed typefaces and high-contrast colors for informational signs.
Handheld signage: fans or parasols with small printed instructions double as props and shade for guests. I printed a simple “Take One” on kraft tags and tied them to a basket of woven fans — cheap, useful, and photo-ready.
4. Make It Last: Weatherproofing & Installation
Goal: signs survive sun, salt, and a rogue wave.
Materials: exterior-grade sealant, outdoor-rated screws, marine adhesive, stainless steel stakes, sandbags.
Steps I swear by: prime and paint both sides of wood panels. Use exterior spray sealer (3 coats). For acrylic, drill pilot holes and use rubber washers to prevent cracking. Anchor every sign with two methods: a spike or stake plus a hidden sandbag. If your sign leans, sand will loosen it; tie it to an immovable object (driftwood post, ceremony arch base).
Pro tip: pack a sign repair kit — epoxy, extra screws, a mini clamp, and a touch-up paint pen. I once re-glued a cracked acrylic welcome sign 20 minutes before guests arrived.
5. Finish with Florals, Favors, and Final Details
Goal: the little signs that make every guest feel seen.
Use small tags on favors (“Thank you — Love Emma & Jake”), QR card signs for gift registry or playlists, and a tasteful hashtag board. Keep the same material palette: if your welcome sign was stained wood, use tiny wood tags for favors.
I added a small acrylic card with a QR code glued to a driftwood slab near the guest book. It looked intentional and matched the larger signs. For price perspective, custom laser-cut acrylic place names cost about $2–$4 each on Etsy, but DIY vinyl on clear acrylic drops that to under $1 per unit.
Final checklist before the first guest arrives
- Test-read every sign from 10–30 feet.
- Double-anchor large pieces and hide the weights.
- Keep a spare sign or printed duplicate in a plastic zip bag.
- Pack sealant and repair tools in your emergency kit.
If you want a fast starter kit: search Amazon for “beach wedding sign kit” or “clear acrylic sheets + vinyl starter” (affiliate theoceanvows). I used a combination of an Amazon acrylic pack and Oracal vinyl to get the crisp, durable look for less than bespoke signage.
Wrap-up: Match materials, font scale, and finish to the venue. Stained wood + matte acrylic = elevated coastal. Weighted bases + exterior seal = practical. Bold type + simplified copy = readable. Do those four things and your DIY wedding signs will actually match your venue — and survive the tide.